
Today, we will explain to you 3 Simple Steps to Create Database. No theory or lengthy technical explanations are given. Just concise instruction for those that want to quickly see what SQL Server is. If you are familiar with Access, MySQL, Oracle, or some other data store application, then this article can serve as the “Hello World” sample application for you. Two different methods can be used to manage SQL Server, the GUI (Graphical User Interface), and the command line. Both will be covered starting with the GUI version. This article assumes SQL is already installed.
Step 1 – Create a Database
A “Database” in SQL Server is a container that holds a group of related objects. In addition to storing the actual data, a Database also stores the structure of how that data is saved (called a Table), and any related helper objects such a Queries (saved ways to look data up). To begin, we’ll create a Database using the graphical interface called the “SQL Server Management Studio”.
From the Windows Start Menu, select “Microsoft SQL Server”, and then “SQL Server Management Studio”. Once the Management Studio starts, right click the Databases folder and select new Database. Enter a name in the “Database name” text box. For this example, well use the name “Test”.

As you the type the database name in, the Logical Name for the file types Data and Log will automatically fill in as well. The “Data” file is where the actual data is saved on the hard drive. The “Log” file keeps track of any changes to that data. Click OK.
Step 2 – Create a Table
Now that the Database is created, a structure to hold the actual data is needed. This structure is called a Table. Think of Tables as containing Columns and Rows, like a spreadsheet.
To create a Table, expand the Databases folder, and then expand the newly created “Test” database.

Right click “Tables” and select “New Table”. You will be prompted to fill in “Column Name” and “Data Type”. Fill in “EmpName” with a data type of “varchar(50)”. In the next row, enter a Column Name of Wage with a data type of “money”.

Unlike Excel or a spreadsheet, a column in a Database must know ahead of time what type of data it will be storing. A data type of VarChar(50) tells SQL Server to expect character data (text), of a variable size not to exceed 50 characters. While you can enter numbers into a VarChar field, they could not be added nor have math functions done against them. For math to be allowed on a column, it must be some type of numeric field, which is why a data type of “money” was used for the Wage column.
Save the Table by clicking the Save icon from the top menu bar. It will prompt for table name, enter “Employees” and click OK.
Step 3 – Enter and View Data
To enter data into the newly created Employees table, expand the Tables folder from the left menu as shown below.
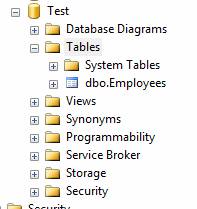
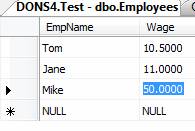
The newly created Employees table will be listed. Right click it and select “Open Table”. A small grid will open. Enter a few data lines as shown below. Moving to a new line after entering data automatically saves.
Finish, Your database ready to use.